PULLED PORK FOR DUMMIES
The complete newbie’s guide to pulled pork!
Before I did my first pulled pork I must have researched it for 3 weeks all over the web (including this site).
It seemed almost like voodoo, turning a piece of cheap pork shoulder into these sublime morsels of deliciousness. I was a bit intimidated, yet determined to get it right the first time.
The following assumes you know NOTHING, and is the culmination of everything I’ve read with a bit of experience thrown in for good measure. Follow these simple steps and you too can have the most crowd-pleasing pulled pork you’ll ever experience. There is no better way to wow a large crowd than pulled pork. The accolades are unending.
WHAT YOU SHOULD HAVE:
- Primo Grill
- Fire Box Divider
- Stacking Extra Rack
- Disposable aluminum loaf pan
- NEW bag of charcoal
- Recycle bin or large box
- Hickory CHUNKS
- Wide roll heavy duty tin foil
- Large camping cooler
- Fresh bath towels
INGRIDEINTS:
- 2 x 7-9 lb pork shoulder bone in (also known as pork butt)
- 2 cups ballpark mustard
- 4 TBS home made chili powder (lots of recipes on the web, worth the effort)
- 4 TBS Dark brown sugar
- 1 TBS Smoked Salish sea salt (Dean and Deluca has it – again worth the effort)
- 2 TBS Summer Savory
- 2 TBS Paprika
- ¼ cup Worcestershire sauce
WHAT YOU SHOULD KNOW:
This is not rocket science, so relax it’s pretty hard to kill a pork butt (unless you open the lid every 5 minutes to check on it – and dry it out), however I’m a bit anal retentive, so I’ll give you my work flow. Some would say this is too much detail and in some cases not necessary, that may be the case, this is just the way I do it.
PREPARING THE FIRE:
The goal here is to keep your full load of charcoal burning for 24 hours.
It will likely take less than that, but when you’re serving guests, that’s the time I use to calculate when to start. If it’s done sooner, that’s where the aluminum foil, towels and camping cooler come in. You can rest a wrapped (foil then towels) pork shoulder in a cooler for half a day and it will still come out hot and ready to pull.
I take a NEW bag of charcoal, because I use all the really big chunks of charcoal and build my fire piece-by-piece. So dump a new bag out into a recycle bin or old cardboard box, and take out all the big pieces (this will be really messy but worth it). Place them individually, making sure you leave lots of room for air to circulate and rise through the coals from the bottom. The goal is to fill one half the firebox to the rim (remember the divider), with all the large chunks at the bottom and working your way up to the medium ones. At the same time you are also interspersing the charcoal with chunks of hickory. At the top of this load you should have smaller bits of hickory and medium bits of charcoal.
Remember you want this fire to be able to breath for 24 hours (ideally without once opening the lid – a tall measure to be sure!), the best way to do this is taking care at the beginning.
It may seem a bit anal retentive, but your fire will be producing a LOT of ash over a day; the goal with building this fire with care, is to make sure all this ash does not over time suffocate your fire. I’ve found a ton if tiny bits, coupled with a fire carelessly built is a pain to regulate – I’ve done it both ways and taking care in the beginning pays off with well controlled stable temperatures. That doesn’t mean you’ll never have to open the bottom vent and blow every now and then, but it sure reduces how often you might have to do it (either that or buy a bbq guru, but that’s another story).
PREPARING THE PORK:
Let me start by saying, I’ve never ordered or picked up pork shoulder/butt (bone in!) from any butcher without a conversation. Seems with this particular cut of meat, people want to know what you’re up to – most of them figure out your about to begin an almost sacred process that is true barbecue.
They all have their own stories and recipes – in short, it’s FUN. I find the same thing when you order up a big brisket.
I almost always do two shoulders; no more work and you can pull the second shoulder and freeze it – it freezes (without any sauce) very well. That is why my list of stuff includes Primo’s optional second stacking rack – one up, one down.
Mix all the above ingredients and then taste. You may want to adjust – this is just a guide, but it is a good basic wet rub.
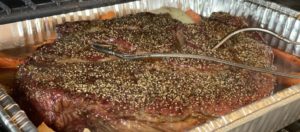
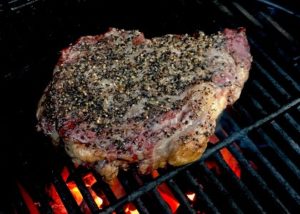
Cover the shoulder with the rub using a spatula. Once both shoulders are well covered throw the meat probe into the middle of the thickest part of the larges pork shoulder. If you have the luxury of two remote digital meat thermometers, place one in each.
Throw the largest butt on the bottom rack, the smaller of two on the top. Both should be fatty side up. Also make sure that you have that aluminum loaf tin half full with water underneath your pork shoulders, which are on the OPPOSITE side of your fire.
Now set your Smoker thermometer. I’m pretty lenient; I set the low temperature to 200 and the high limit at 250 degrees. I try to keep my fire around 225 degrees. This remote thermometer is great, as once set, an alarm will go off if your Primo gets too hot or too cold. I camp out downstairs over night and pray the alarm doesn’t sound in the middle of the night! (Makes my wife crazy …and she loves to tell this part of the story but in NO ONE is disappointed with the end result). Set the meat part of the dual channel thermometer to 190 degrees – that’s the magic temperature! Also make sure you put the temperature probe into the dome after removing your Primo analogue one.
*** One word about temperature. You will notice the temperature of your pork butts rise slowly over time. Then at one point it will stop (around 165 degrees). It will plateau there for hours, as all that tough meat is slowly converted into pure deliciousness. ***
So your fire is ready, your butts are ready.
It’s now time to light the fire, close the lid, and not lay eyes on your butts for about a day. Keeping the lid closed at all times will ensure your pork is moist and delicious.
To start the fire I fill the chimney with just enough small pieces of charcoal to fill the bottom – not more. Once fully lit, I evenly sprinkle these little bits of coal over the fully loaded fire box. The goal here is to build to temp slowly, if you overshoot by a large margin, it takes for ever to get the temp down, the key here is patience.
So close the lid and open both the top and bottom vent fully. This will let the smaller coals slowly ignite the larger ones. Once you hit about 200 degrees, close both top and bottom to small slits. Adjust to local conditions (wind, external temp, etc) so you’re sitting around 225. It usually takes me about a half an hour to settle it in to a stable temp.
Now keep that fire going until you hit 190 degrees. Remove and wrap butts in foil, then towels, then let them rest at least an hour in the cooler.
Pull, with either a couple of forks – a couple of friends and family members – or wear those food prep rubber gloves, add your favorite bbq sauce or vinegar sauce and enjoy!!! (But TRY to save room for dinner…it will be very, very difficult to stop “testing” all the various sizes of outside and inside bits.)
There are many differing opinions around our table about the right buns. I like really cheap buns (nothing fancy) so you highlight the meat and not the bread! Most guests do too. My wife and a few others like a slightly toasty bun, crunchy on the outside, moist and delicious on the inside. Know too that a coleslaw on the side is the perfect accompaniment.
Hope this is useful!